Categories
Organize and visualize your events using categories. Categories provide a powerful way to group events, apply colors, and analyze how you spend your time.
Overview
Categories allow you to:
- Group related events - Organize events by project, context, or any classification system
- Apply visual colors - Each category gets its own color for easy identification on the calendar
- Track time distribution - See how much time you spend on different categories with built-in statistics
- Filter and search - Quickly find all events in a specific category
Setting Up Categories
Category Property Configuration
First, configure the category property in your calendar settings:
- Go to Settings → [Your Calendar] → Properties
- Set the Category property field (default:
Category) - This property will be used to read and write categories in your event frontmatter
Category Format
Categories can be specified in your event frontmatter in two formats:
# Single category
Category: Work

# Multiple categories (YAML array)
Category:
  - Work
  - Meeting
  - Important
Both formats are supported throughout the plugin. When you assign categories using the UI, they're automatically saved in the appropriate format.
Assigning Categories
You can assign categories to events in multiple ways:
Keyboard shortcuts
From anywhere inside an event modal:
- Ctrl+Shift+C (Win/Linux) / ⌘⇧C (Mac) — open the Assign categories picker.
- Ctrl+Shift+P (Win/Linux) / ⌘⇧P (Mac) — open the Assign prerequisites picker.
1. Auto-Assignment (Event Creation and Editing)
Categories can be automatically assigned when creating or editing events based on the event name. When you finish typing the event title and move to another field, the system checks if the title matches any auto-assignment rules and replaces the categories accordingly.
Configure in Settings → Categories → Auto-assign categories:
Auto-assign when name matches category
When enabled, if the event name matches a category name (case-insensitive, ignoring ZettelID and instance dates), that category will be automatically assigned when you finish typing the title.
Example:
- Type "Health" and click away → Categories replaced with "health"
Substring matching for categories and presets
When enabled, both category auto-assignment and category assignment presets use substring matching (case-insensitive, ignoring ZettelID and instance dates) instead of requiring exact name matches. This is useful when your event names are more descriptive than your category or preset names.
Examples:
- Type "Youtube Analysis" and click away → "Youtube" category is auto-assigned
- Type "Personal Health Checkup" → Both "Personal" and "Health" categories are auto-assigned (if both exist)
- A preset with event name "Gym" will match events named "Gym Session" or "Morning Gym"
Custom category assignment presets
Custom category assignment presets require Prisma Calendar Pro. The basic "auto-assign when name matches category" toggle is free.
Define custom rules to automatically assign specific categories based on event names. Each preset can assign multiple categories, and now supports multiple comma-separated event names in a single preset for maximum flexibility.
How it works:
- When you finish typing the event title (lose focus from the title field), the system checks for matches
- If the event name matches any of the comma-separated names in a preset, those categories are assigned
- Presets take precedence: when a preset matches, the "auto-assign when name matches category" and substring-match rules are skipped — only the preset's categories apply
- If no preset matches, the system falls back to the name/substring category matching rules
- If a match is found, categories are replaced with the auto-assigned ones
- If no match is found, your manually selected categories remain unchanged
- This makes the behavior intentional and predictable - you see exactly what gets assigned
- Works in both create and edit modals - change an event's title and categories will auto-update based on the new name
- Perfect for quick event creation workflows with consistent naming patterns
For consistent event naming, use Title Autocomplete — it suggests matching names as you type, preventing typos before they happen.
2. Individual Events (Manual)
Edit the event note directly and add the category property:
---
Category: Work
Start: 2025-01-15T09:00:00
End: 2025-01-15T10:00:00
---
3. Event Context Menu
Click on any event in the calendar and select "Assign Categories" from the context menu. This opens the category assignment modal with the event's current categories pre-selected.
4. Event Modal (Create/Edit)
When creating or editing an event, use the "Assign Categories" button in the modal. Categories are displayed with their configured colors, and you can modify them before saving the event.
Quick Category Removal: Each category displayed in the modal has a small "×" button on the right side. Click this button to instantly remove that category without opening the category assignment modal. This provides a faster workflow for removing individual categories.
5. Batch Assignment
Select multiple events in batch mode and use the "Categories" button to assign categories to all selected events at once.
📖 See Batch Operations for detailed batch assignment instructions.
6. Recurring Events
Assign categories to recurring events through the Recurring Events Modal (accessible via command palette: "Show recurring events"):
- Click the "Category" button next to any recurring event to assign categories using the unified category assignment command
- Categories automatically propagate to all physical instances based on your frontmatter propagation settings
- Each recurring event displays a category-colored background across the entire row with a left border accent for easy visual identification
- The instances list modal displays a category-colored background gradient when viewing a recurring event's instances
📖 See Recurring Events (DSL) for more details on recurring event management.
Category Assignment Modal
All category assignment interfaces share the same powerful modal:
- Multi-select with search - Filter and select multiple categories simultaneously
- Pre-selected categories - Current event categories are automatically checked
- Create new categories - Type a non-existent category name and click "Create New" to add it on the fly with the default event color
- Color indicators - Each category displays its configured color from Settings → Categories
- Override behavior - Assigned categories completely replace existing categories (doesn't merge)
- Remove all categories - Uncheck all categories and click "Remove Categories" to clear categories
- Full undo support - Restores previous category state (batch operations only)
- Keyboard navigation - Navigate categories with arrow keys and Enter to select, or press Enter to submit the form
Keyboard Shortcuts
The category modal supports full keyboard navigation for faster workflows:
- Arrow Down / Arrow Up: Move the highlight through visible category items (wraps around)
- Enter (with highlight): Toggles the highlighted category's checkbox (select/deselect)
- Enter (with search text, no highlight): Selects the first filtered category and clears the search
- Enter (empty search, no highlight): Submits the form with currently selected categories
- Escape: Closes the modal
The highlight resets when the search input changes, and the highlighted item automatically scrolls into view.
Example workflow:
- Press Arrow Down twice to highlight the third category → Press Enter → That category is toggled
- Type "Uni" in the search → Press Arrow Down → Press Enter → "University" category is toggled
- Press Enter again (no highlight, empty search) → Form submits
Managing Categories
Visual Category Management
The Categories Settings page (Settings → Categories) provides a comprehensive interface for managing categories and viewing statistics:
Event Statistics Overview
At the top of the page, you'll see overall event statistics showing:
- Total Events - Total count of all events in your calendar (timed + all-day + untracked)
- Timed Events - Number and percentage of events with specific start/end times
- All-Day Events - Number and percentage of all-day events
- Untracked Events - Number and percentage of untracked events that carry a category
This provides an instant overview of your event distribution patterns.
Category List with Detailed Statistics
Each category is displayed in a visually distinct card with a subtle background tint matching the category's configured color. This makes it easy to identify categories at a glance and provides a cohesive visual experience.
Each category card displays:
- Automatic Detection - All categories from your events are automatically detected and listed
- Visual Color Coding - Each card has a subtle background tint in the category's color, making it easy to visually identify categories
- Comprehensive Event Counts - Each category shows:
- Total number of events (timed + all-day + untracked)
- Percentage of all events
- Timed events count and percentage within that category
- All-day events count and percentage within that category
- Untracked events count and percentage within that category
- Interactive Controls - Properly spaced buttons for easy access:
- Edit Button (Pencil Icon) - Rename the category across all events
- Delete Button (Trash Icon) - Remove the category from all events
- Color Picker - Click to change the category's color
- Real-time Updates - Changes are reflected immediately on the calendar
Example: Work: 45 total (30%) • 40 timed (89%) • 5 all-day (11%) • 0 untracked (0%)
A category that lives only on untracked events (notes that carry your category property but have no Start Date / End Date / Date) still shows up in this list.
This detailed breakdown helps you understand not just how many events are in each category, but also the nature of those events (timed vs all-day). The visual design makes it easy to scan through categories and quickly identify the ones you're looking for.
Renaming and Deleting Categories
Renaming Categories
To rename a category across all your events:
- Go to Settings → Categories
- Click the pencil icon next to the category you want to rename
- A modal appears showing:
- The current category name
- An input field for the new name
- The number of events that will be affected
- An "Also apply to N untracked events with this category" checkbox (shown only when at least one untracked event uses the category, ticked by default)
- Enter the new category name and click "Save"
- The plugin automatically:
- Updates the category property in all affected event files (and untracked notes when the checkbox is ticked)
- Adjusts the associated color rule to use the new category name
- Shows a progress indicator during the operation
- Refreshes the calendar, the Categories list, and statistics so every view shows the new name immediately — no restart needed
Example: Renaming "Work" to "Business" will update all events with Category: Work to Category: Business and update the color rule from Category.includes('Work') to Category.includes('Business'). Untracked notes carrying Category: Work are rewritten too unless you uncheck the toggle.
After the rename, a notice shows an Undo link. Click it (or run Prisma Calendar: Undo from the command palette) to revert both the frontmatter rewrites and the matching color rule in a single step. Prisma Calendar: Redo re-applies them.
Deleting Categories
To remove a category from all your events:
- Go to Settings → Categories
- Click the trash icon next to the category you want to delete
- A confirmation modal appears showing:
- The category name being deleted
- The number of events that will be affected
- A warning message if events will be modified
- An "Also apply to N untracked events with this category" checkbox (shown only when at least one untracked event uses the category, ticked by default)
- Click "Delete" to confirm
- The plugin automatically:
- Removes the category from all affected event files (and untracked notes when the checkbox is ticked)
- Deletes the associated color rule
- Shows a progress indicator during the operation
- Refreshes the calendar, the Categories list, and statistics so the old name disappears everywhere immediately — no restart needed
Example: Deleting the "Work" category will remove it from all events that have Category: Work or Category: [Work, Meeting], and delete the Category.includes('Work') color rule. Untracked notes are cleaned up too unless you uncheck the toggle.
Deletion is also undoable: the post-action notice exposes an Undo link that restores both the frontmatter on every affected note and the deleted color rule. Prisma Calendar: Redo re-applies the deletion.
Pie Chart Visualization
Below the category list, an interactive pie chart shows the overall category distribution with click-to-filter functionality.
How Category Colors Work
Behind the scenes, category colors are stored as color rules using expressions like Category.includes('Work'). This means:
- Category colors integrate seamlessly with the color rules system
- You can manually create category color rules if needed
- Category colors follow the same priority system as other color rules
📖 See Color Rules for more details on the underlying color system.
Viewing Events by Category
Click on any category to open a Bases table view showing all events with that category. This works in two places:
1. Event Modal
Click any category badge in the event creation/edit modal to view all events with that category.
2. Settings → Categories
Click any category name in the categories settings page to view all events with that category.
Category View Features
The category view displays:
- Filtered Events - All events in that category from your events folder
- Smart Columns - File name, date property, status, and any additional properties configured in Bases view properties setting
- Newest First - Events sorted by the configured date property from newest to oldest
- Customizable Columns - Add additional frontmatter properties as columns via Settings → Properties → Bases view properties
- Full Bases Integration - Complete Bases functionality for filtering, sorting, and viewing event details
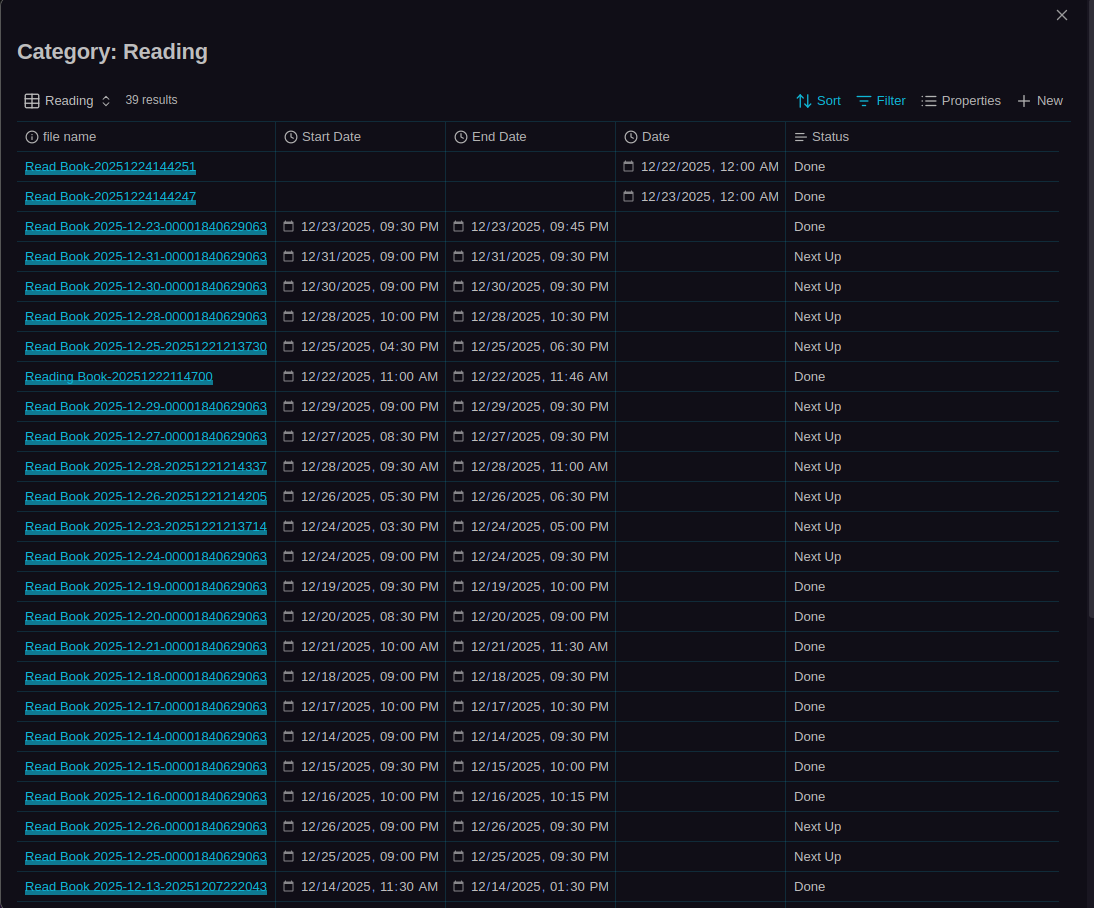
This provides a quick way to see all events in a specific category without manually filtering the calendar view. You can:
- Click on any event to open its note
- Sort by any column
- Use Bases features to further filter or analyze the events
- See all event properties in a structured table format
Configuring Additional Columns:
To add more properties as columns in the category events view:
- Go to Settings → Properties
- Find Bases view properties
- Enter comma-separated property names (e.g.,
priority, project, tags) - These properties will appear as additional columns when viewing events by category
Category Statistics
Categories integrate with the statistics system to show time distribution:
- Go to Statistics in the calendar toolbar
- Switch to Category aggregation mode
- View time spent on each category with pie charts and detailed tables
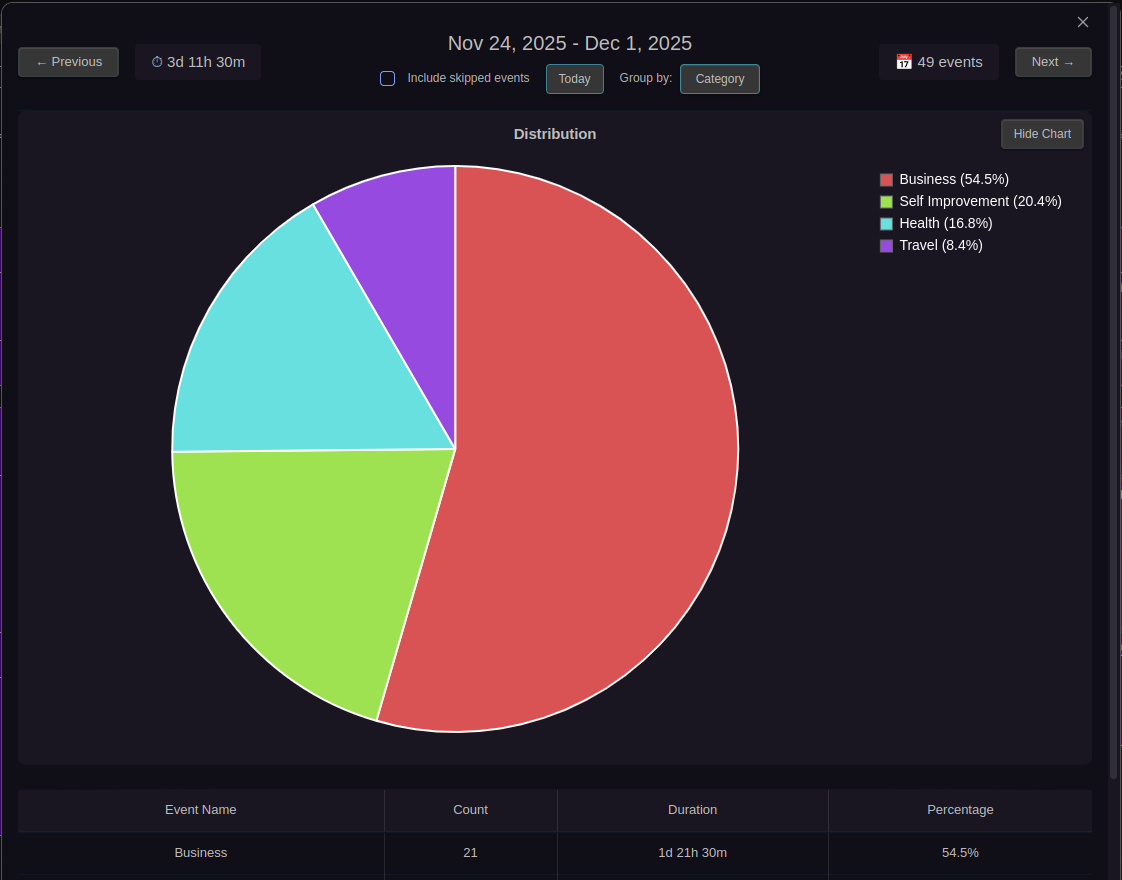
Categories with the Break property configured will have break time subtracted from the total duration in statistics.
📖 See Statistics for more details on time tracking and analysis.
Related Features
- Color Rules - Understanding the color system that powers category colors
- Batch Operations - Assigning categories to multiple events at once
- Statistics - Analyzing time spent on different categories
- Filtering - Filtering events by category expressions